Lucie ​Makes, Bakes, Creates.
  • Home
  • Shop
    • Digital Art Gallery
    • Cookie Cutters >
      • View All Cutters
      • Birthday & Celebration Collection
      • Baby Shower Collection
      • Bridal & Wedding Collection
      • Cars & Trucks
      • Champagne Bottles & Beverages
      • Fashion & Accessories
      • Florals
      • Summer & Tropical
      • Autumn & Halloween
      • Hanukkah
      • Tiles, Plaques, & Shapes
      • Christmas Season
      • Hearts, Love & Valentines
      • Spring, Easter, & St. Paddy's
      • Animals & Insects
      • SUGAR BOX Exclusives
      • STL Cutters
    • Embossed Parchment Paper
    • Decorating Supplies
    • Workbooks & Graphics
    • MiniCake Stands >
      • MiniCake Stands
      • Prototypes & Discounts
      • STL Cake Stand Files
    • STL LIBRARY >
      • STL Cutters
      • STL Cake Stands
      • STL Cookie Display Stands
      • STL Files for Molds & Boo-Boo Sticks
    • My Recipes
    • Amazon Recommendations
    • Other Amazing Online Shops!
  • Cookie Classes
    • Workbooks & Graphics
    • Free Tutorials
    • Easter & Springtime Classes & Guides
    • Summertime Classes & Guides
    • Autumn & Halloween Classes & Guides
    • Winter & Christmas Classes & Guides
    • Champagne & Liquor
    • Fashion Classes & Guides
    • Portrait Classes & Guides
    • 3D Printing & Cookie Preservation
  • Custom Cookies
    • Content Creation
  • Blog

Quarantine Activity #2: Homemade Honeycomb Candy

3/28/2020

0 Comments

 
Picture
  • 1 cup white sugar
  • ​1/4 tablespoons corn syrup
  • 2 tablespoon honey
  • 1/4 tablespoons water
  • 2 teaspoon baking soda​​
​
  1. Use a silicon mat or parchment paper to line a 8x8 cake pan. Place your 2 tsp of baking soda in a bowl ready to go!
  2. On medium heat, stir sugar, corn syrup, honey, and water together in a saucepan. Continue to stir until the sugar is fully dissolved. 
  3. When it begins to bubble, stop stirring and secure your candy thermometer to the saucepan. When it's ready, the liquid will be totally clear and the thermometer will reach 300 degrees F (149 degrees C). 
  4. Immediately remove from heat and dump in baking soda. Mix with a spatula until fully incorporated and pour into your lined baking pan. Allow the honeycomb to spread on it's own and do now not touch it after you've poured it into your pan. Allow to cool at room temperature for at least one hour.
  5. When it's totally cool, you can remove it from the pan and break it into pieces! I also decorated my honeycomb candy with royal icing transfers of butterflies, dragonflies, bees, and ladybugs (you can find the template for those here!)

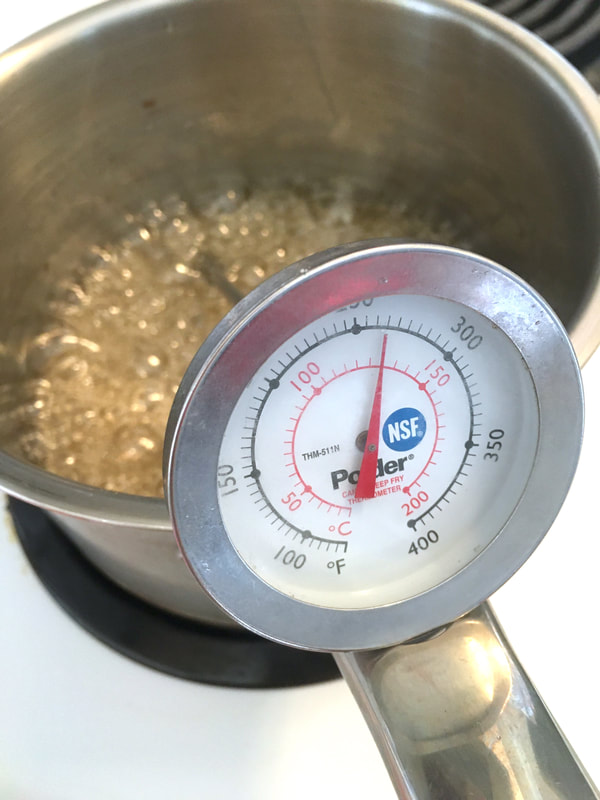
A FEW NOTES ON ACHIEVING THE PROPER TEMPERATURE:

Don't ever increase the heat, leave it at medium to medium-high for the entire time. 

The first time I tried this recipe, I tried to let my mixture reach 300F on the candy thermometer, but it never did. After about 10 minutes of being stuck on 250F, I could smell the sugar burning and the colour of the liquid quickly turned amber in colour. At this point, there was nothing to do but to throw it out (burnt sugar is so gross, do not try to salvage it). 

The second attempt, I let it boil for only a few minutes and it didn't quite reach 250F, when I added the baking soda, it foamed but stayed in total liquid form (also unsalvageable). I just did not cook it long enough - all the water had not yet evaporated and it hadn't reached hard-crack stage.

On my third attempt, it still did not reach 300F. It stayed just above 250F for several minutes, and I watched it extremely closely. The bubbles became smaller and the liquid looked much thicker in appearance. I hung around the pot for a few more minutes keenly sniffing for the smell of burnt sugar and watching to make sure the liquid remained clear and did not amber. Using my best judgement, I removed it from the heat and added in the baking soda. This time it worked! 

So if you're mixture does not quite reach 300F don't stress about it, just keep a very close eye on it!

Picture
Picture
Picture
0 Comments

Your comment will be posted after it is approved.


Leave a Reply.

    Archives

    May 2022
    July 2021
    March 2021
    May 2020
    April 2020
    March 2020
    February 2020
    December 2019
    November 2019

    Categories

    All

    RSS Feed

© 2023 Lucie Radcliffe Design 
  • Home
  • Shop
    • Digital Art Gallery
    • Cookie Cutters >
      • View All Cutters
      • Birthday & Celebration Collection
      • Baby Shower Collection
      • Bridal & Wedding Collection
      • Cars & Trucks
      • Champagne Bottles & Beverages
      • Fashion & Accessories
      • Florals
      • Summer & Tropical
      • Autumn & Halloween
      • Hanukkah
      • Tiles, Plaques, & Shapes
      • Christmas Season
      • Hearts, Love & Valentines
      • Spring, Easter, & St. Paddy's
      • Animals & Insects
      • SUGAR BOX Exclusives
      • STL Cutters
    • Embossed Parchment Paper
    • Decorating Supplies
    • Workbooks & Graphics
    • MiniCake Stands >
      • MiniCake Stands
      • Prototypes & Discounts
      • STL Cake Stand Files
    • STL LIBRARY >
      • STL Cutters
      • STL Cake Stands
      • STL Cookie Display Stands
      • STL Files for Molds & Boo-Boo Sticks
    • My Recipes
    • Amazon Recommendations
    • Other Amazing Online Shops!
  • Cookie Classes
    • Workbooks & Graphics
    • Free Tutorials
    • Easter & Springtime Classes & Guides
    • Summertime Classes & Guides
    • Autumn & Halloween Classes & Guides
    • Winter & Christmas Classes & Guides
    • Champagne & Liquor
    • Fashion Classes & Guides
    • Portrait Classes & Guides
    • 3D Printing & Cookie Preservation
  • Custom Cookies
    • Content Creation
  • Blog