Lucie ​Makes, Bakes, Creates.
  • Home
  • Shop
    • Digital Art Gallery
    • Cookie Cutters >
      • View All Cutters
      • Birthday & Celebration Collection
      • Baby Shower Collection
      • Bridal & Wedding Collection
      • Cars & Trucks
      • Champagne Bottles & Beverages
      • Fashion & Accessories
      • Florals
      • Summer & Tropical
      • Autumn & Halloween
      • Hanukkah
      • Tiles, Plaques, & Shapes
      • Christmas Season
      • Hearts, Love & Valentines
      • Spring, Easter, & St. Paddy's
      • Animals & Insects
      • SUGAR BOX Exclusives
      • STL Cutters
    • Embossed Parchment Paper
    • Decorating Supplies
    • Workbooks & Graphics
    • MiniCake Stands >
      • MiniCake Stands
      • Prototypes & Discounts
      • STL Cake Stand Files
    • STL LIBRARY >
      • STL Cutters
      • STL Cake Stands
      • STL Cookie Display Stands
      • STL Files for Molds & Boo-Boo Sticks
    • My Recipes
    • Amazon Recommendations
    • Other Amazing Online Shops!
  • Cookie Classes
    • Workbooks & Graphics
    • Free Tutorials
    • Easter & Springtime Classes & Guides
    • Summertime Classes & Guides
    • Autumn & Halloween Classes & Guides
    • Winter & Christmas Classes & Guides
    • Champagne & Liquor
    • Fashion Classes & Guides
    • Portrait Classes & Guides
    • 3D Printing & Cookie Preservation
  • Custom Cookies
    • Content Creation
  • Blog

Churro Macarons ft. Lovelie Cakes Macaron Recipe!

5/4/2022

0 Comments

 
Tara from @loveliecakes has the best Macaron Recipe available in her Highlights (it's the only macaron recipe I use)! Go give her a follow on Instagram because, well, she's awesome!

​I used her recipe, and added some extras to create these tasty Chocolate-stuffed Churro Macarons for Cinco de Mayo! Keep reading for the recipe and instructions!
Picture
Watch my Instagram Reel HERE!

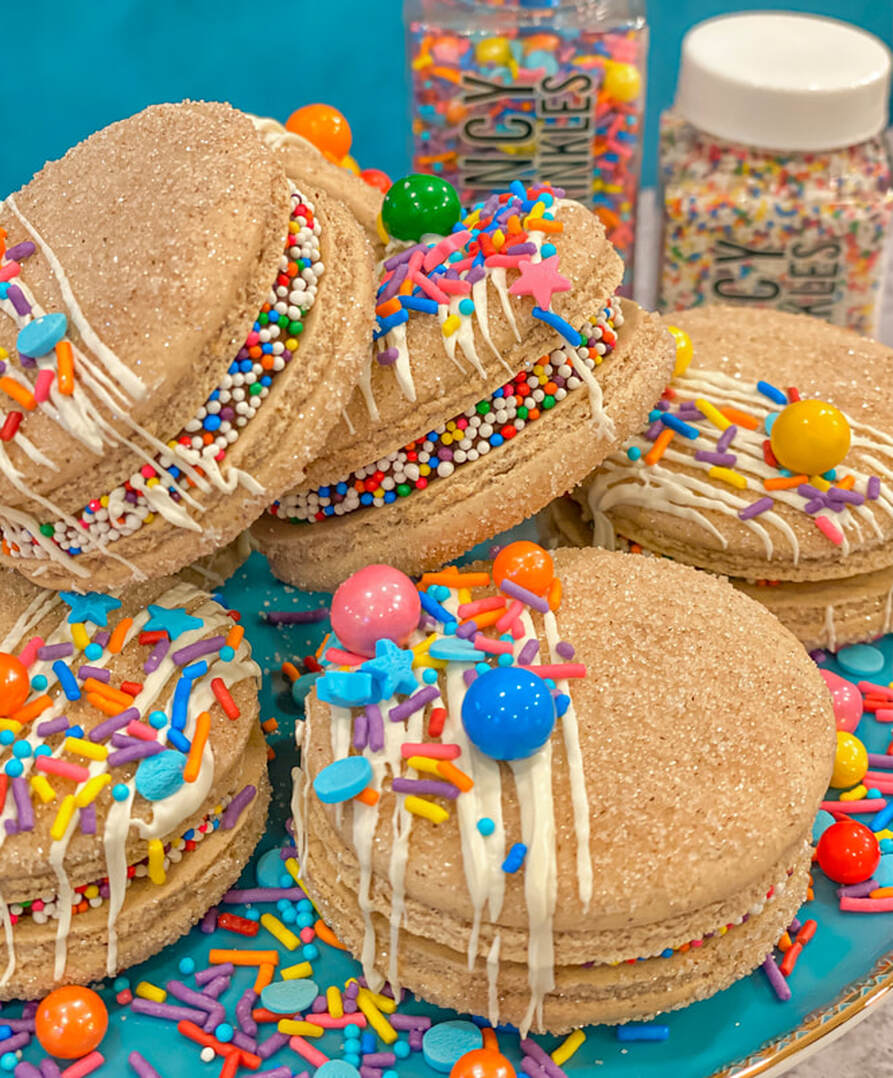
Lovelie Cakes French Macaron Recipe:

​You'll need a food scale! If you don't have one, grab one HERE.
  • 125 grams sifted ground almond flour
  • ​240 grams sifted powdered/icing sugar
  • 74 grams sugar
  • ​146 grams room temperature egg whites
  • 1 teaspoon vanilla extract
  • For Churro Macarons, add 2 tsp ground cinnamon

Simple Syrup:
  • 1/2 cup water
  • 1/2 cup sugar

Cinnamon-Sugar Coating Mix
  • 1/2 cup sugar
  • 1 tbsp cinnamon (add an extra tablespoon if you really love cinnamon!)
  • Optional: 2 tsp Diamond White Prism Powder from Fancy Sprinkles (use code LUCIEBAKES15 for 15% off at fancysprinkles.com)

Whipped Chocolate Ganache Filling:
  • 1 cup semi-sweet chocolate chips
  • 1/2 cup whipping cream
​
Decoration:
  • Vanilla Easy Candy by Fancy Sprinkles (use code LUCIEBAKES15 for 15% off at fancysprinkles.com)
  • Your choice of Sprinkle Blends!​

Instructions:

Prepare the simple syrup by boiling 1/2 cup water and 1/2 cup sugar, stirring constantly, until the sugar has fully dissolved. Transfer to a heat-safe container and chill in the fridge.

​Prepare the whipped ganache by bringing the whipping cream to a boil, and then whisking it into the chocolate chips. Stir with a fork until the ganache is totally smooth. Allow to cool. Once the mixture is no longer hot, transfer to a mixing bowl and beat on high until the ganache becomes fluffy and lighter in colour (similar to buttercream consistency). Place aside. 

​For the Macarons:
  1. Prepare your Cookie Baking Sheet with a Silicone Baking Mat
  2. Prepare your Piping Bag with a Small Round Tip
  3. Sift your flour and powdered sugar into your scale as you measure/weigh the amounts
  4. Add your egg white, granulated sugar, and vanilla to your mixer. Mix on low speed for two minutes, medium speed for two minutes, and then high speed for two minutes.
  5. If you want to add food colouring to your macaron batter, add it here! Mix until stiff peaks form in the meringue base.
  6. Remove the bowl from your mixer. Add in your sifted dry ingredients, including the cinnamon, and mix by hand with a spatula until the batter is smooth and "ribbons" as it falls from your spatula.
  7. ​Transfer to your piping bag and pipe onto your baking mat.
  8. Bang pan on counter to pop any air bubbles in the batter.
  9. Let skin form for 20-30 minutes. Macs should lose their shine, and should not transfer to fingers when touched.
  10. ​Preheat oven to 285 F when Macs have formed a skin, and bake for 19-20 mins.
  11. ​After baking, let Macs cool completely before removing from the baking sheet.

Now that your Macaron Shells are ready,​ put your whipped ganache into a piping bag, and pipe a blob in the centre of one macaron shell. Sandwich with another macaron shell and press together. If you want, roll the edge of the macaron in sprinkles to cover the exposed ganache filling the middle!

Use a soft, clean paintbrush and brush the outside shell of the macaron with simple syrup, then press each side into your cinnamon-sugar mixture. Place on a baking mat so the cinnamon-sugar mix can set on the macaron. 

Finally, prepare your Fancy Sprinkle Easy Candy, and drizzle over your Churro Macarons! Decorate with your choice of sprinkles and allow the easy candy drizzle to harden! Enjoy! 

Watch my Instagram Reel HERE!
0 Comments

Homemade Fancy Fudge!

7/19/2021

0 Comments

 
Picture
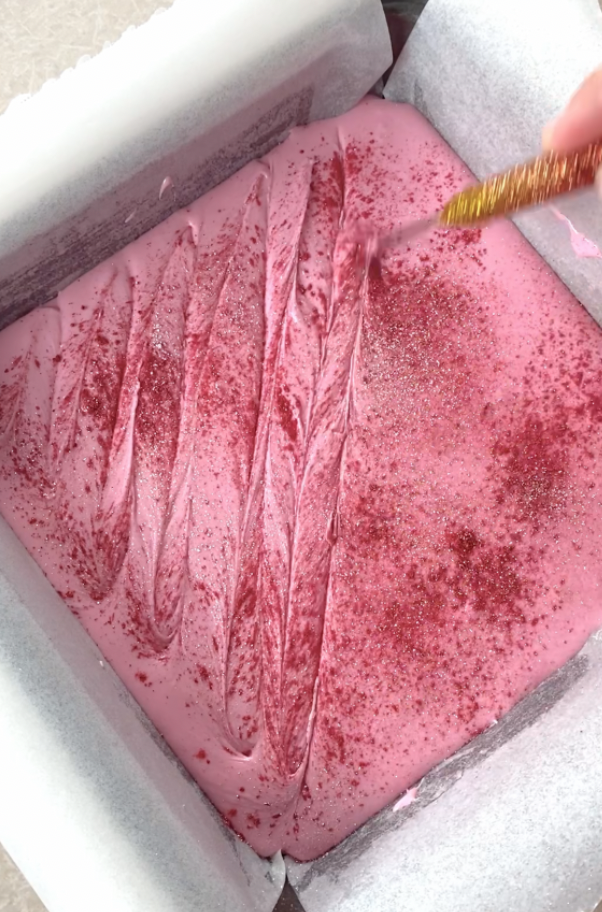
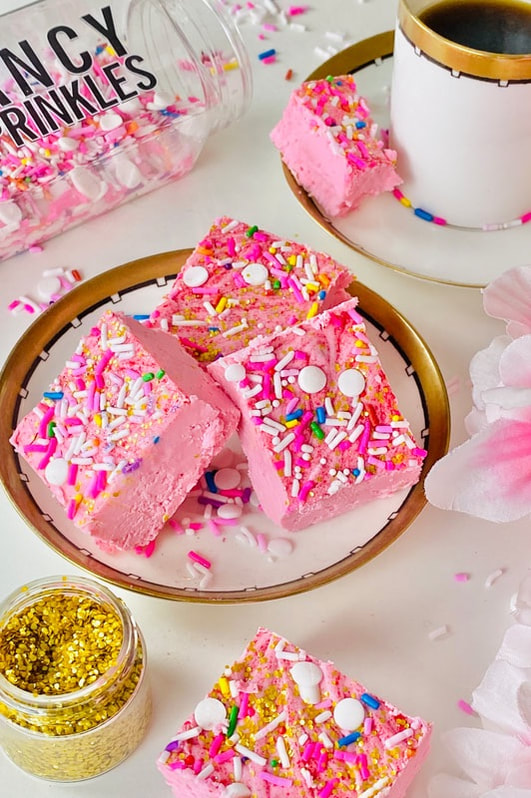
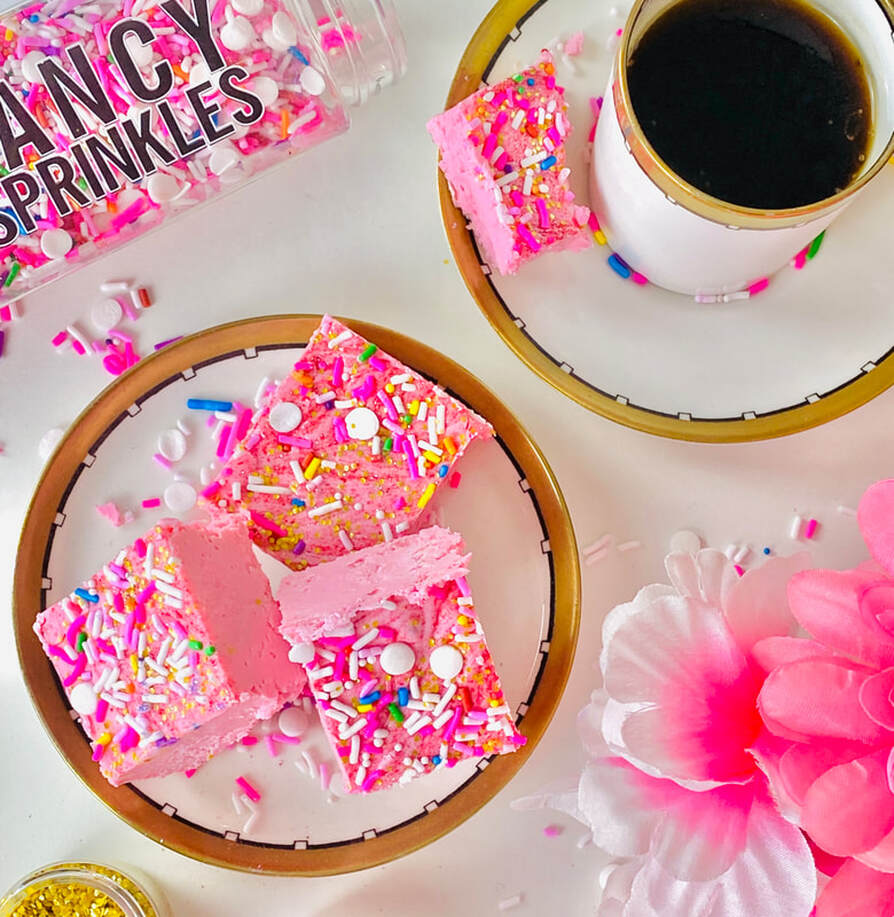
​Here's the recipe I used for my vanilla-raspberry homemade fudge!

  • 1 tablespoon butter
  • 3 cups granulated sugar
  • 1.5 cups heavy cream
  • ¼ cup light corn syrup
  • ¼ teaspoon salt
  • 1 tablespoon vanilla
  • 2 tbsp freeze-dried raspberry powder (or strawberry!), plus extra for topping off the fudge with.
  • Colour Mill oil-based colouring
  • Fancy Sprinkles Prism Powder, Glitter, and Sprinkle blends! (Use code LUCIEBAKES15 for 15% off!)

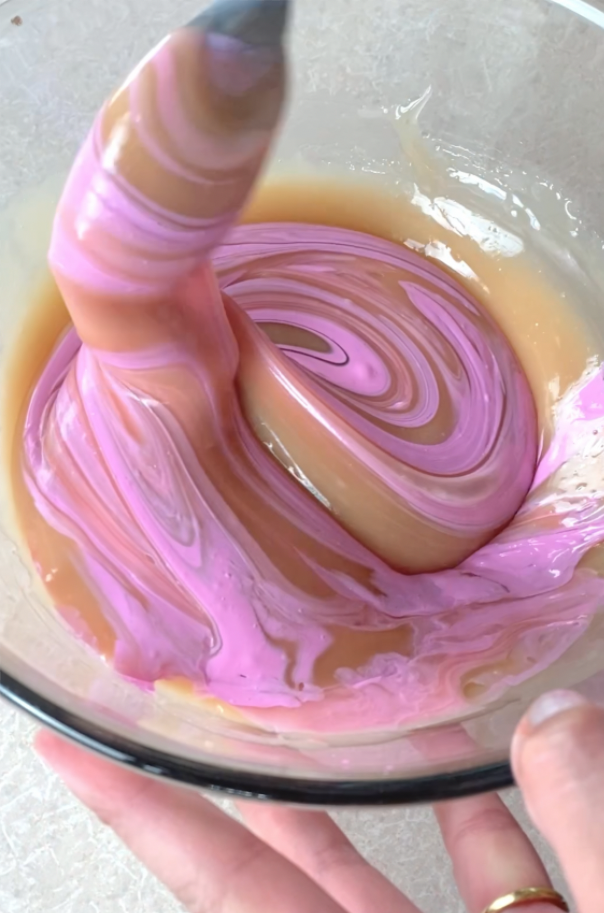
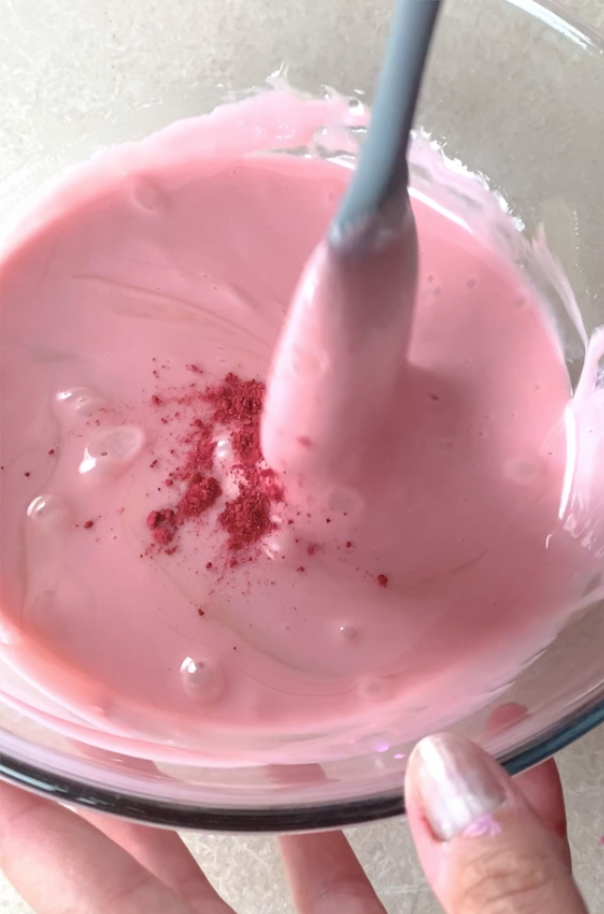
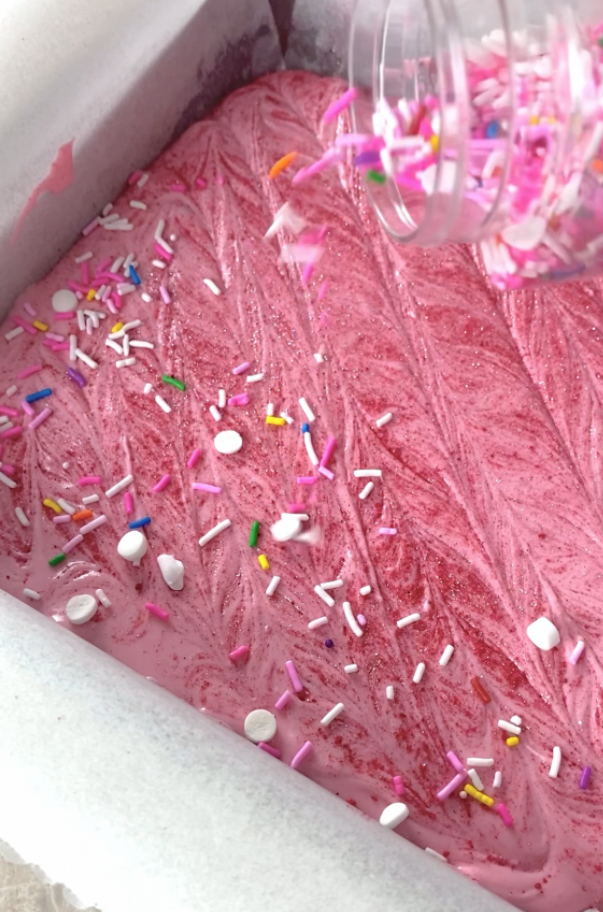
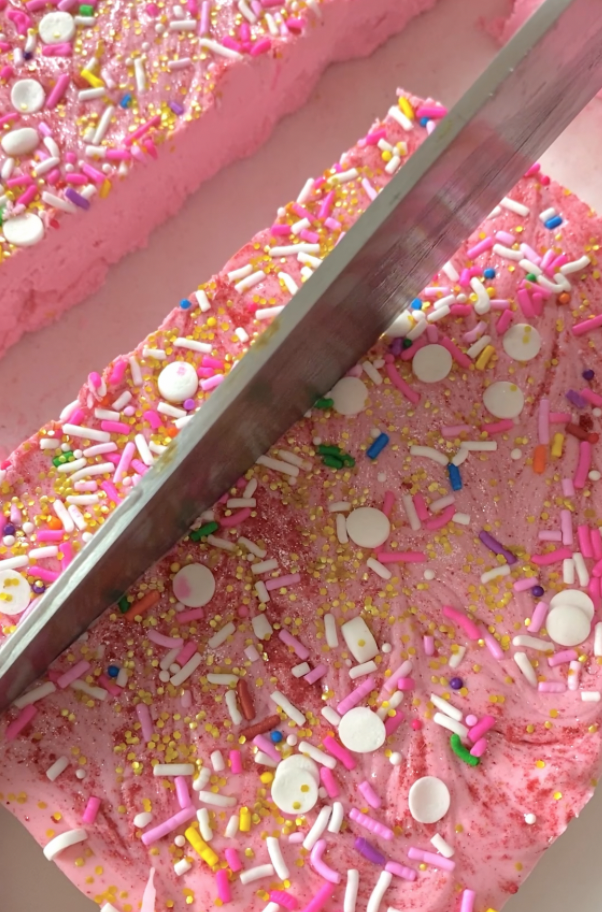
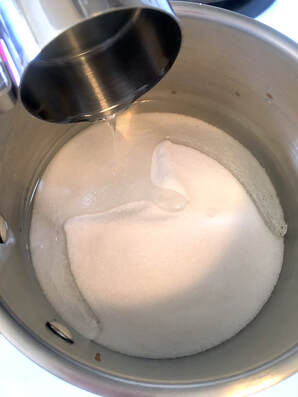
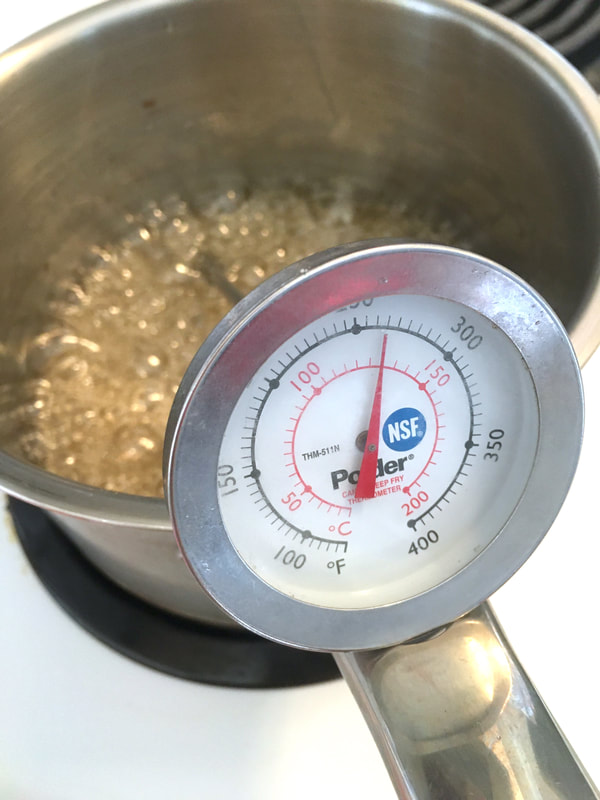
Grease a round or square cake pan (8x8), and line with parchment paper. Alternatively, you can use silicone molds/pans for your fudge! Grab a microwaveable glass bowl and place it on a cooling rack near the stove. Add 1 tbsp butter and the vanilla to the bowl.

Add sugar, cream, corn syrup, and salt to a medium pot, and heat on medium-low. Use a pastry brush and water to continuously wet down the sides of the pots to avoid sugar crystals from forming, alternating between wetting down the pot and stirring the mixture with a small silicone spatula. After about 5 minutes the sugar will have fully dissolved. Remove the silicone spatula from the mixture and place to the side.

Place your candy thermometer into the mixture and prop against the side of the pot. Increase the temperature slightly (about medium-high), and allow to boil without stirring at all. Once the mixture reaches 240 F, remove from the stove and pour into the glass bowl containing the butter and vanilla. Do not scrape the pot, just let the mixture pour into the bowl. Add the thermometer back into the mixture in the glass bowl. Do not mix the fudge at this point, allow it to cool until the thermometer reaches 110 F. This will take about 1.5-2 hours.

Once it's cooled down, add the Colour Mill colouring to your fudge, grab your silicone spatula and begin to stir your fudge mixture. Add more colouring if necessary, and add in your 2 tbsp freeze-dried raspberry powder. Stir for about 10-15 minutes (you can take breaks!) The more you stir your cooling fudge, the smoother and less grainy the fudge will be when it sets. Transfer the fudge to your lined cake pan or silicone molds, and decorate the top with extra freeze-dried raspberry powder, prism powder, glitter, and sprinkles!

Let it rest on the counter for an additional hour, and then transfer to the refrigerator for 8 hours (or overnight)! Once it's set, pop it out of the molds or the cake pan, and use a sharp, greased knife to slice into bite-sized pieces!


Picture
Picture
Picture
Picture
Picture
Picture
0 Comments

The BEST EVER Cinnamon Buns!

3/6/2021

0 Comments

 
Picture
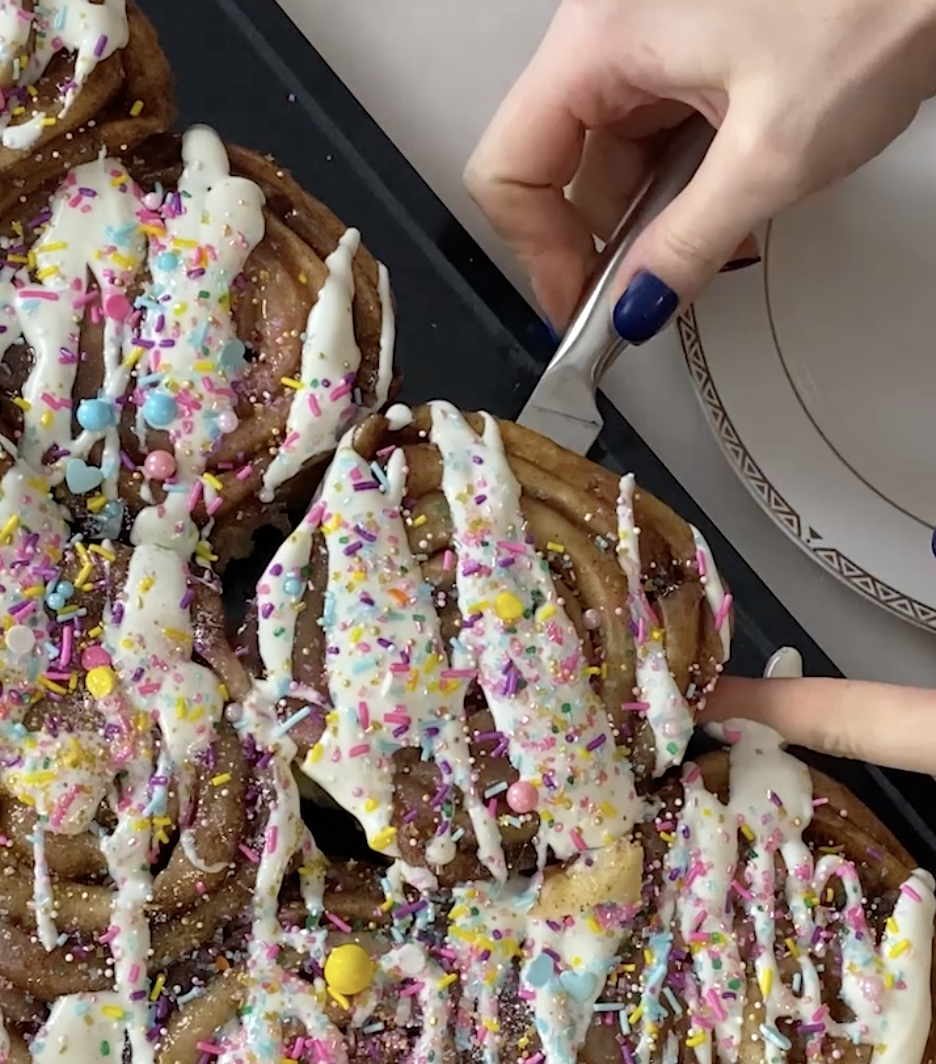
The UBC CINNAMON BUNS are my favourite of all time - my mom always makes them on holiday and special occasions, and I literally can't get enough of them! You can find the original recipe for them here: https://food.ubc.ca/ubc-cinnamon-bun-recipe/; but note - the original recipe makes a TON!! For my version of this recipe, I actually half the dough, but keep the filling quantity the same lol! 

Without further ado, here's my adapted recipe!!

For the Dough:
  • 1.25 cups milk
  • 1/4 cup International Delight Creamer (your favourite flavour!)
  • 3 tbsp butter
  • 1 tbsp sugar
  • 1 tsp salt
  • 1/2 cup warm water
    • combined with 1/2 tsp sugar
    • and 2.25 tsp active dry yeast
  • 1 egg
  • 4.5 cups flour

For the Filling:
  • 3/4 cup melted butter
  • 1 cup sugar
  • 1/4 cup International Delight creamer (your favourite flavour!)
  • 2 tbsp cinnamon

For the Cream Cheese Frosting
  • 1/2 cup cream cheese, softened in the microwave
  • 2 tbsp sugar
  • 1 tsp vanilla extract

Let's get started!
  1. Scald milk (stovetop or microwave! Just make sure it's hot!), Stir in room temp butter until fully melted. Add sugar and salt. Cool in fridge until lukewarm.
  2. Combine your 1/2 tsp sugar and active dry yeast with the warm water, stir, and allow to sit for 10 minutes.
  3. In a large bowl, combine milk mixture with the egg. Stir in dissolved yeast mixture.
  4. Add half of the flour and mix with a wooden spoon until combined. Continue to add the remaining flour. Once it becomes to hard to mix with your spoon, pour it all out onto a clean counter and knead for 10 minutes, to fully incorporate the rest of the flour. Add a bit more flour as necessary if it starts to become super sticky while you're kneading it. This will be a very soft dough though!
  5. Place the dough in a greased bowl, cover with plastic, and allow to rise for an hour.
  6. When the dough has doubled in size, place it back onto your lightly floured counter, give it a good beating and roll it out until it's a very large rectangle (like 18 x 12 inches)
  7. Prepare your filling, and spread half of your filling mixture onto the rolled out dough.
  8. Roll it up!
  9. Grab a big baking pan, and pour the remaining filling mixture into the bottom of the pan. Cut your cinnamon roll into 2 inch slices, and place about 1 inch apart in the pan. 
  10. Cover the pan with plastic wrap, and allow the buns to rise again for another 45 minutes.
  11. Once they've doubled in size, bake at 350 F for about 40 minutes.
  12. When they're done, remove them from the oven, grab and even larger baking pan or tray. Place the second baking pan/tray (or heat safe serving tray) over the cinnamon buns, and VERY CAREFULLY flip the entire thing, inverting the cinnamon buns and removing them from their baking pan.
  13. Prepare your cream cheese frosting and drizzle over top! Add some colourful sprinkles! (I get mine from FANCY SPRINKLES; you can use code LUCIEBAKES15 at the Fancy Sprinkles checkout for 15% OFF your Fancy Sprinkles order!)


0 Comments

A simple Baked Donut Recipe for your Pool Floatie Treats!

5/18/2020

2 Comments

 
Picture
Picture
Picture
Picture
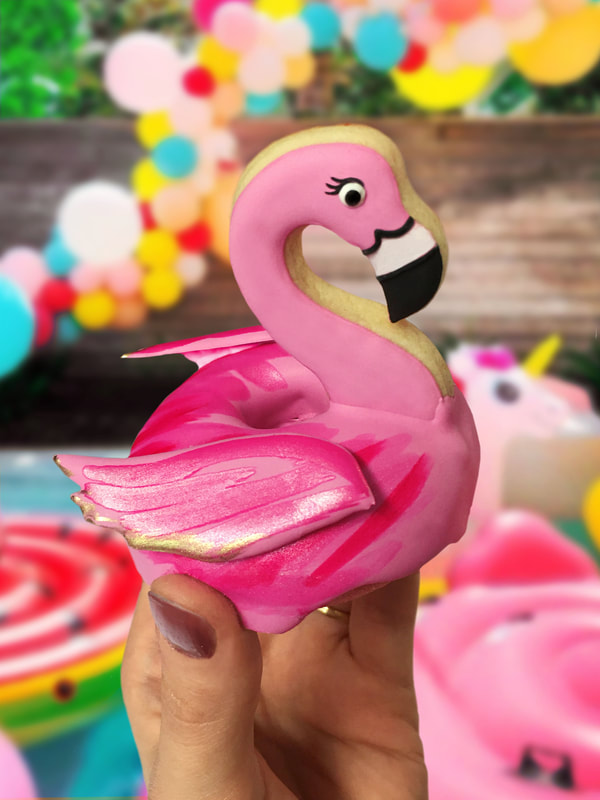
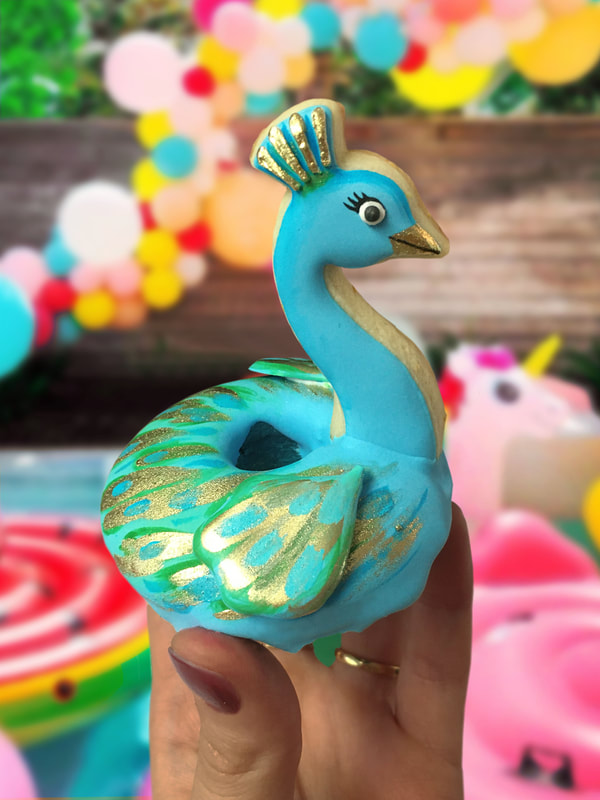
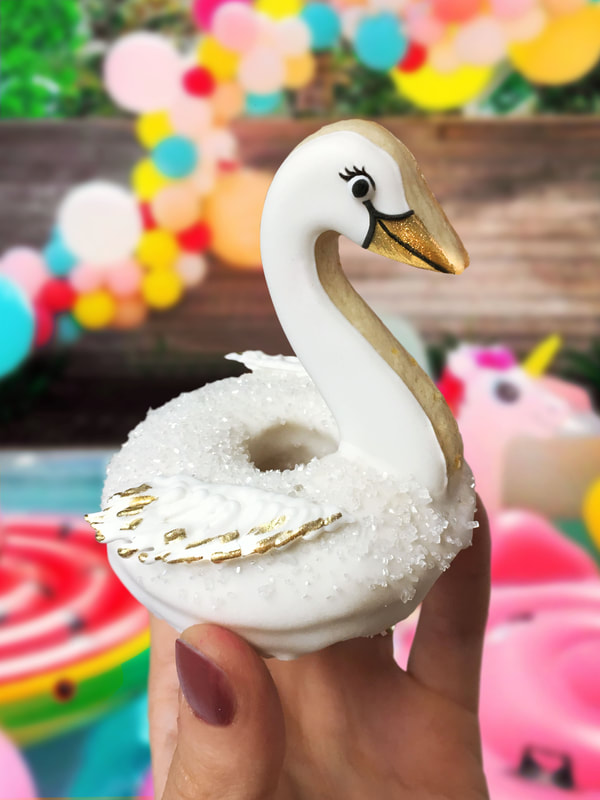
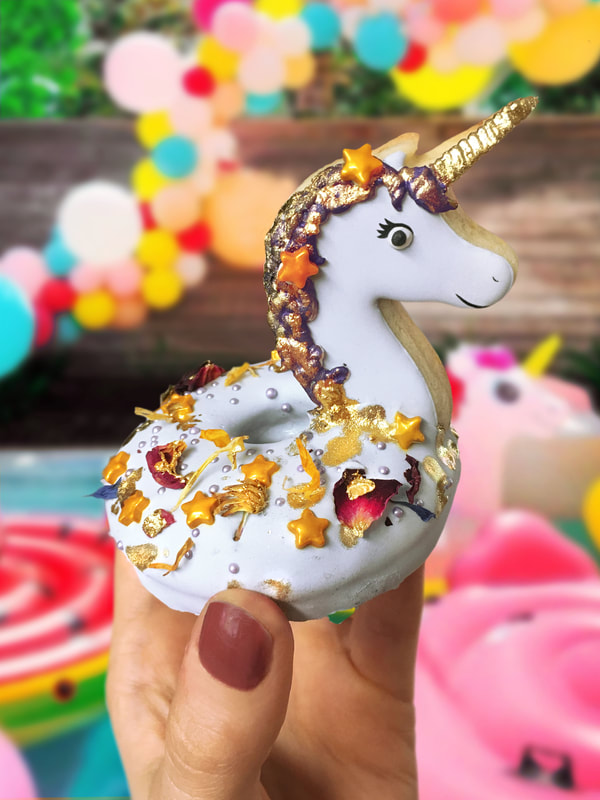
Check out the step-by-step picture tutorial for my Pool Floatie Donuts on my website here!
​

You can use any baked donut recipe you'd like for these, but here's the one I used! (Makes 12 donuts)


  • 2 cups all-purpose flour
  • 2/3 cup granulated sugar
  • 2 teaspoon baking powder
  • 1 teaspoon salt
  • 1/4 cup butter, melted
  • 2 eggs
  • 3/4 cup milk
  • 2 teaspoon vanilla extract
  • Optional: LorAnn Candy Flavourings
  • Optional: Food Colouring 

  1. Preheat the oven to 350 degrees F.
  2. In a large bowl, combine the the flour, sugar, baking powder and salt.
  3. In a smaller bowl, combine egg, milk, butter and vanilla extract.
  4. Add wet ingredients to the dry ingredients and stir until well-combined (but do not over-mix).
  5. Add your candy flavouring if you'd like!
  6. ​Spoon batter into piping bags, and piping the batter into your silicone donut molds. 
  7. Place the molds onto a baking sheet, and bake in the oven for 8 to 10 minutes.
  8. Allow the donuts to cool for a few minutes before removing from the silicone pans.


2 Comments

Quarantine Activity #4: Make your own mozzarella cheese

4/10/2020

0 Comments

 
That's right! I made my own cheese the other day. But only after I finished making it, did I realize I could have used food colouring to make it a fun Easter pastel colour! Darn! 

Here's the recipe and instructions:
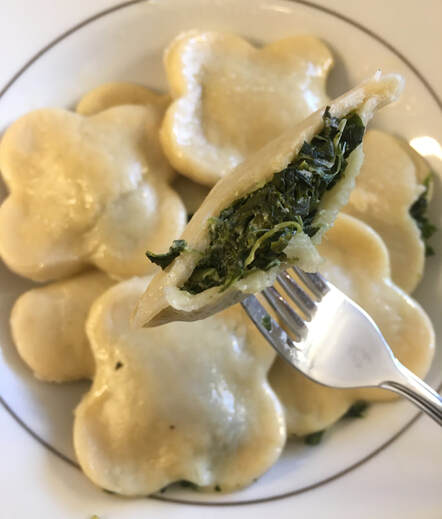
  • ​4 letres / 1 gallon milk (you can use skim, 1%, 2%, or homogenized. However, the lower the fat content of the milk, the less stretchy the cheese will be.)
  • 1/4 teaspoon (1/4 tablet) Rennet (available on Amazon) + 1/4 cup water
  • 1.5 teaspoon citric acid + 1 cup water
  • ​cooking thermometer & a large pot (bit enough to fit a gallon of milk)
​
  1. Add Rennet to the 1/4 cup water and stir until combined. Set aside.
  2. ​Add citric acid to the 1 cup water, combine, and add to your large cooking pot.
  3. Heat the milk on your stove at a low temperature until your thermometer reaches 90 F - 95 F. This is a really low temperature! It'll barely be warm. If you heat it up to much, just turn off the heat and wait for the temperature to lower until it's back down at 90 F - 95 F. 
  4. Remove the warm milk from the heat, and add in the Rennet + water mixture. Mix for several seconds until fully combined.
  5. Cover your pot and allow to fit for 5-10 mins.
  6. ​At this point, the milk will have curdled, and soft, chunky cheese curds will have separated from the liquid. It will look like mushy feta. Drag a small knife through your cheese until it's cut into 1 inch squares.
  7. ​Put your pot back on the heat, and with your thermometer, allow it to heat to 105 F. Slowly stir your curdled cheese. The longer your stir, the firmer the cheese will be.
  8. Now it's time to drain your curdled cheese! I scooped mine out of the pot into a bowl with a slotted spoon.
  9. Now it's time to microwave the cheese. If you don't have a microwave, use this method: Place your cheese in a fine sieve, and submerge it in a pot of hot water (similar to how a double boiler would work, but with a sieve and not a pot). Use your thermometer and allow the internal temp of the cheese to raise to 135 F. Remove from heat and knead. You may have to do this a few times to keep the temperature of the cheese up.
  10. ​If you are using a microwave, place your cheese in a microwaveable safe bowl, and put into the microwave for 30 seconds. Knead while it's still warm. You may need to microwave a couple more times to keep the temperature of the cheese up. 
  11. The cheese will begin to get smooth and stretchy! Add a dash of salt as you're kneading the cheese for flavour. 
  12. Form it into a ball, and it's ready to eat! Wrap in plastic and store in the fridge :)
0 Comments

Quarantine Activity #3: Homemade Dinner & Dessert Ravioli!

4/1/2020

0 Comments

 
Picture
Picture
RAVIOLI PASTA:
  • 2 cups all-purpose flour
  • 1 pinch salt
  • 1 teaspoon olive oil
  • 2 eggs
  • 1 1/2 tablespoons water
  • Egg Wash: 1 egg + 1 tbsp water for 

SPINACH FILLING:
  • 1 cup frozen spinach
  • 4-6 oz herb & garlic cream cheese (you can use plain cream cheese too and add in a dish of garlic powder though!)

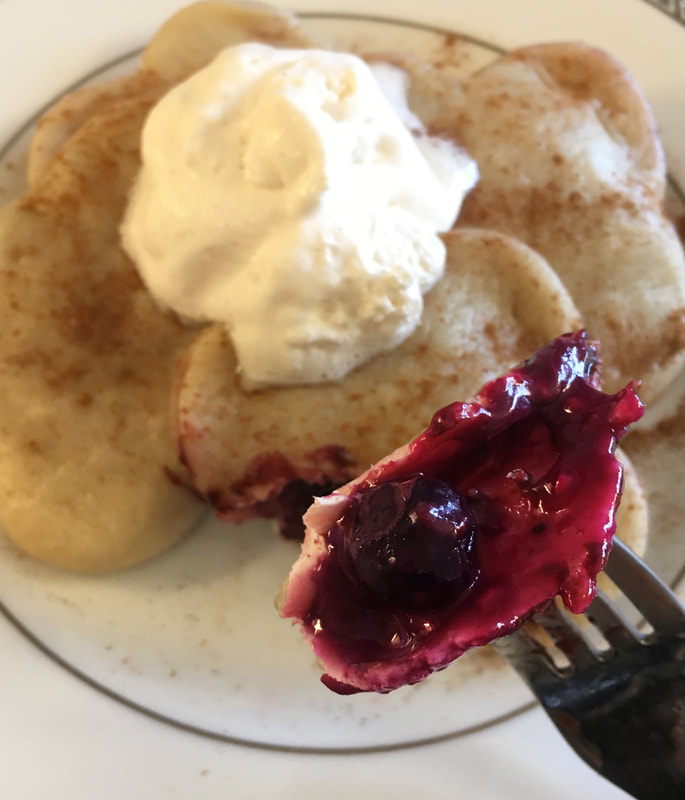
CHOCOLATE & BERRY FILLING
  • 1 cup frozen berries
  • 1/4 cup chocolate chips 
  • 1 heaping tbsp fruit jam
  • 1 heaping tbsp flour
 
  1. In a bowl, combine flour and salt and form into a mound with a well in the centre. Whisk the olive oil, eggs, and water in a separate bowl. Add half of the egg mixture to the flour and mix. Add the remaining egg mixture, remove from bowl and knead.
  2. Knead the dough for about 8 to 10 minutes. If your dough is too sticky, add flour. If your dough is too dry, add water by the tablespoon until it's soft and stretchy. Wrap your dough in plastic wrap and refrigerate for an hour.
  3. Now, prepare the ravioli fillings! Combine the ingredients for your Savoury filling and mix until incorporated, and set aside. Combine the ingredients for your Sweet filling and mix until incorporated. Set aside.
  4. Preheat oven to 375 degrees F (190 degrees C). Combine your final egg and water to make the egg wash.
  5. Roll out your pasta dough into thin sheets. You can do this manually with a rolling pin and parchment paper (and stretch the dough out by hand as well), or use a pasta maker. To assemble the ravioli, brush the egg wash over your thin sheet of pasta. Drop the filling mixture on the dough by teaspoonfuls about one inch apart. Cover the filling with the top sheet of pasta, pressing out the air from around each portion of filling. Press firmly around the filling to seal. Cut individual ravioli with a knife or cookie cutter!
  6. Fill a large pot with salted water and bring to a boil over high heat. Add in the ravioli and cook until the ravioli float to the top (about 5 minutes). 
  7. Grease a baking sheet. Place the cooked ravioli on the sheet and bake for about 4 minutes.
  8. Enjoy your fresh ravioli! Top the savoury ravioli with your favourite sauce, or for the savoury ravioli, top with a dollop of whipped cream or ice cream!
0 Comments

Quarantine Activity #2: Homemade Honeycomb Candy

3/28/2020

0 Comments

 
Picture
  • 1 cup white sugar
  • ​1/4 tablespoons corn syrup
  • 2 tablespoon honey
  • 1/4 tablespoons water
  • 2 teaspoon baking soda​​
​
  1. Use a silicon mat or parchment paper to line a 8x8 cake pan. Place your 2 tsp of baking soda in a bowl ready to go!
  2. On medium heat, stir sugar, corn syrup, honey, and water together in a saucepan. Continue to stir until the sugar is fully dissolved. 
  3. When it begins to bubble, stop stirring and secure your candy thermometer to the saucepan. When it's ready, the liquid will be totally clear and the thermometer will reach 300 degrees F (149 degrees C). 
  4. Immediately remove from heat and dump in baking soda. Mix with a spatula until fully incorporated and pour into your lined baking pan. Allow the honeycomb to spread on it's own and do now not touch it after you've poured it into your pan. Allow to cool at room temperature for at least one hour.
  5. When it's totally cool, you can remove it from the pan and break it into pieces! I also decorated my honeycomb candy with royal icing transfers of butterflies, dragonflies, bees, and ladybugs (you can find the template for those here!)

A FEW NOTES ON ACHIEVING THE PROPER TEMPERATURE:

Don't ever increase the heat, leave it at medium to medium-high for the entire time. 

The first time I tried this recipe, I tried to let my mixture reach 300F on the candy thermometer, but it never did. After about 10 minutes of being stuck on 250F, I could smell the sugar burning and the colour of the liquid quickly turned amber in colour. At this point, there was nothing to do but to throw it out (burnt sugar is so gross, do not try to salvage it). 

The second attempt, I let it boil for only a few minutes and it didn't quite reach 250F, when I added the baking soda, it foamed but stayed in total liquid form (also unsalvageable). I just did not cook it long enough - all the water had not yet evaporated and it hadn't reached hard-crack stage.

On my third attempt, it still did not reach 300F. It stayed just above 250F for several minutes, and I watched it extremely closely. The bubbles became smaller and the liquid looked much thicker in appearance. I hung around the pot for a few more minutes keenly sniffing for the smell of burnt sugar and watching to make sure the liquid remained clear and did not amber. Using my best judgement, I removed it from the heat and added in the baking soda. This time it worked! 

So if you're mixture does not quite reach 300F don't stress about it, just keep a very close eye on it!

Picture
Picture
Picture
0 Comments

Quarantine Activity #1: Make your own bagels!

3/20/2020

0 Comments

 
Picture
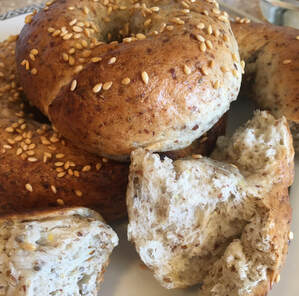
I usually prefer to bake sweet things, but now that I've been isolated to my apartment for several days, I need a break from all the sugar (and also I need some regular food to eat)! It's been a really long time since I last made bagels, but boy is it ever fun! And a warm, fresh bagel is seriously one of the most delicious things! I don't have kids, but I had a ton of baking up bagels, so I can only imagine kids would too! Once you've got all your ingredients mixed up well, divide it up and get your kids to knead it! At the kneading stage, kids (and adults) can also work in food colouring, sprinkles, raisins, chocolate chips, nuts and seeds, rosemary leaves, onion flakes, etc., to customize their own bagels! The flavour possibilities are endless for both sweet and savoury bagels! Plus, the bagels will then make a great breakfast/snack/lunch option!

  • 1.25 cups water
  • 4 cups flour + 0.5 cup flaxseed (or omit the flaxseed and use 4.5 cups flour
  • 3 tbsp white sugar
  • 1 tsp salt
  • 2 tbsp vegetable oil (you can use melted butter if you're out of veggie oil)
  • 1 tbsp instant yeast
  • Optional: 2 tbsp chia seeds + 2 tbsp water

Combine all ingredients in a bowl and mix! You can use a stand mixer with a dough hook, or mix and knead by hand. Knead until the dough is quite stretchy - about 10 minutes! Cover your dough (in the bowl) with plastic wrap, and a tea towel, and allow it to rise for 2 full hours. Punch the dough down and transfer it to your working surface. Roll the dough into a log and slice as many or a few pieces as you want! Shape each slice using your finger to punch a hole in the centre and working it into a bagel shape. Repeat with all your slices, and allow to sit for another 15 minutes. Preheat your oven to 475 F. Bring 4 quarts of water to a boil in a saucepan, add in about 0.25 cup corn syrup (or honey) and a dash of salt. Boil the bagels, 3 at a time (or as many fit in your saucepan) for about 1 minute on each side. Transfer to a baking sheet lined with parchment paper, and sprinkle each bagel with sesame seeds, rock salt, rosemary... whatever your desired toppings are! Bake for 15-20 minutes until the tops of the bagels begin to brown. Remove from over and allow to cool for 10 minutes. Enjoy!

Watch the tutorial on youtube here:

0 Comments

In honour of International Women's Day & National Eating Disorder Awareness Week

3/8/2020

2 Comments

 
Today was International Women's Day, two days ago it was my 31st birthday, and last week was National Eating Disorder Awareness Week. I celebrated my birthday, and acknowledged International Women's Day on Instagram with my "Buffy the Vampire Slayer" cookie. But National Eating Disorder Awareness Week came and went and I completely ignored it - but why? I'm a woman and I addressed International Women's Day, I'm also a former sufferer of eating disorders, but I didn't address it at all. I have 38,000+ followers on Instagram, and I should use that platform to talk about important things - even if they make me a bit uncomfortable. So I'm going to address it here, for the first time outside of my immediate family and closest friend group.

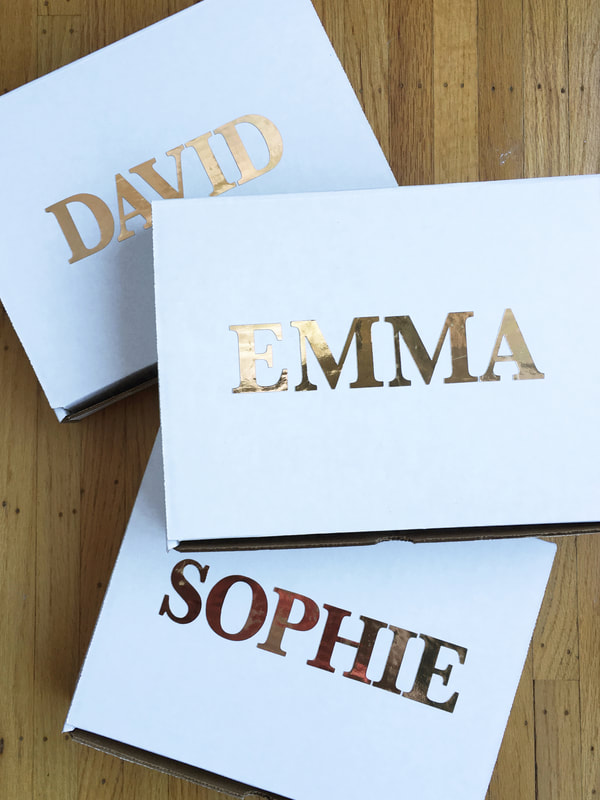
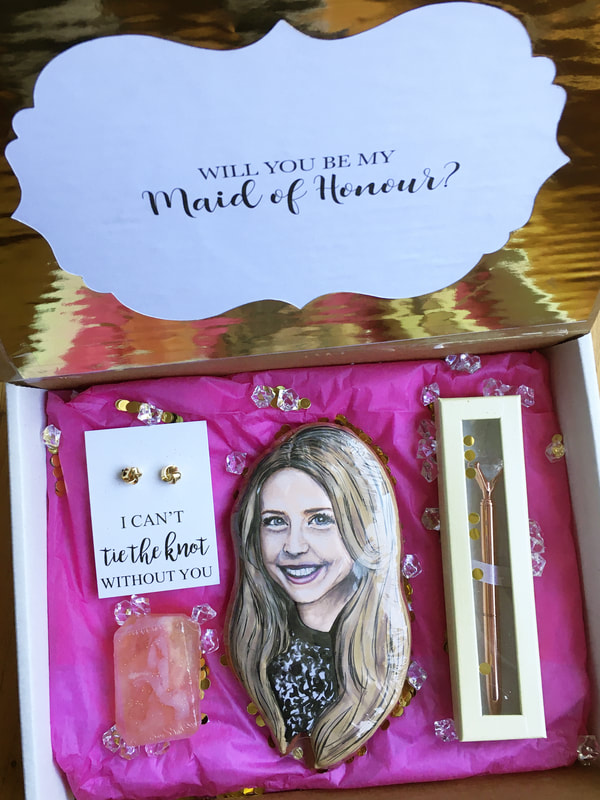
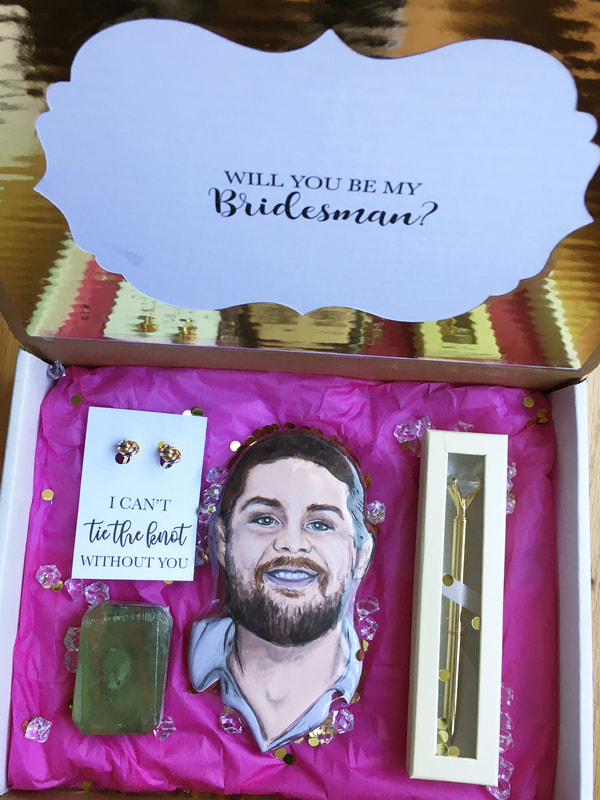
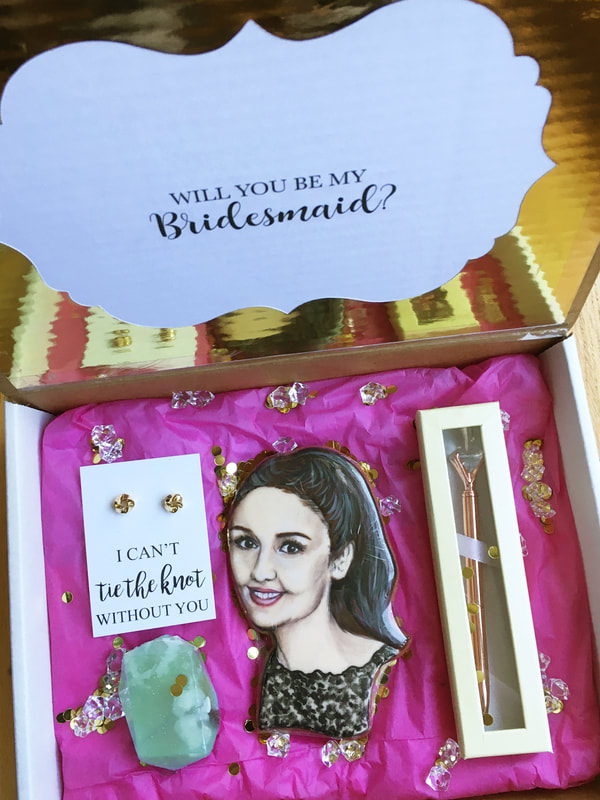
From the ages of 21-25 I was plagued by disordered eating habits. I swung between extreme phases of raging bulimia, anorexia, and obsessive exercising. I was clinically depressed, had terrible body dysmorphia, and severe anxiety which occasionally bordered on panic disorder. I would be up every night until 2am binging and purging, then go to bed, and wake up at 5am so I could run 10 kilometres before I had to be at work or school. I WAS A MESS and I looked it too. I constantly had open cuts across my knuckles from where they repetitively hit my teeth, my cheeks were always puffy, and my hair became very thin and brittle. I also developed terrible Irritable Bowel Disorder (it does run in my family, and that's what I'd tell people), although the actual reason I developed it was because of my binging and purging - I had literally destroyed all the healthy bacteria in my digestive system. Every time I ate, I'd get terrible abdominal pain and bloating, which in turn would encourage more purging. It's a very vicious, disgusting cycle of shame, and it took me years to recover from the IBS. So many people think eating disorders are all about vanity and physical appearance, and that's definitely a factor. But more often, it's a physical manifestation of a mental illness, such as depression, severe stress or anxiety, in an attempt to gain control over an aspect of your life. Amazingly, it didn't affect my school work - that was something else I was able to keep control over.

(The areas I did not have control over was my personal and family life. I went through a very bad breakup at 21, and there was extreme dysfunction within my household that had yet to become even more painful. I literally had panic attacks trying to get out of my car to go inside after coming home from work/school. But that's a story for another time!)

After nearly a year of dealing with this on my own and only getting worse, I sought help. I went to therapy, and spoke candidly with my doctor. My therapist was not very encouraging of me taking anti-depressants, but let me tell you - they literally saved my life. They got me to a stable place mentally, where I could then begin to deal with the issues I had been going though. The stigma that revolves around taking anti-depressants is similar to the stigma of mental illness (aka it's bad). And they certainly didn't numb my brain or anything like that, in fact, everyday became a sun-shiny wonderful day and I was so genuinely happy again.

I was also lucky enough to have an incredibly supportive, insightful mom holding my hand through my absolute worst years (2012 was by far the sickest, worst year of my life). By the time I was 25 (2014), I was pretty much completely recovered physically. The full mental recovery was much more difficult, but for the last few years, I've been in a really excellent place - I met my now-fiancé, we bought and renovated a house together, and now we're getting married in December.

I was told by a professional that eating disorders on average have a lifespan of 11 years (from the first manifestation of it, until full recovery is achieved); it's now been 10 years since I began my struggle, and it's really shaped who I've become. I'm much more confident, happy, emotionally mature, but also a bit more unforgiving (I take my relationships very seriously, if it's not a two way street, I'm not going to travel on it - or I'm at least going to travel on it extremely cautiously). The last few years of baking has really helped reshape my relationship with food, and was incredibly effective in helping me channel my energy in a productive and creative way.

I posted my "Buffy the Vampire Slayer" cookie this morning for International Women's Day because it was one of my favourite shows growing up and she was one of the first strong feminist role models on TV at the time. Buffy fearlessly fought and defeated vampires and demons in a literal sense, and that's an encouraging metaphor for so many women who have their own demons to fight. 

So thank you for reading along! If you're going through something similar, please don't hesitate to reach out if you wanna chat :)
2 Comments

Will you be in my Bridal Party?

2/20/2020

0 Comments

 
Picture
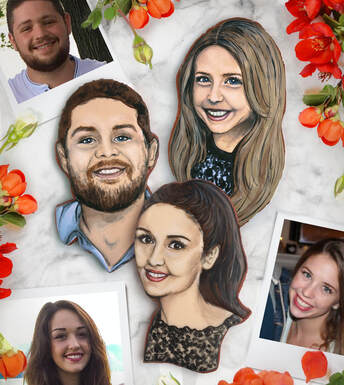
My three younger siblings are my very best friends, so it wasn't even a question that they would each be in my Bridal Party; before I even got engaged they knew they would be my Bridesmaids & Bridesman! Don't get me wrong, we weren't always best friends; there's a seven year age gap between me (the eldest) and Sophie (the youngest), and that makes a huge difference when you're 15 and 8 years old.  We all had completely different interests and personalities (we still do!), and man did we fight. So, thank god we grew up!*

(*and by "Growing Up", I mean we ALL put in a LOT of very hard work for years.)

When I think of what I want my future wedding photos to look like, the pictures that I'll have of me with my three Bridal Party members will also be "siblings-only photos", and that is just so meaningful to me! I can't wait to gain new family members and start a family of my own, but, Em D & S will always be my OG siblings - the 4 Radcliffe kids - we grew up together, experienced the same tough times together, and celebrated in each other's milestones together. 

Even though they already knew they'd be in my Bridal Party, I still wanted to ask properly! I made them each a Red Velvet painted portrait cookie, Emma and Sophie each got a pair of gold knot earrings from The Jewelry Bx on Etsy, David got gold knot cufflinks from PerfectCufflinks on Etsy, they each got a Diamond Pen from ElliesPaperie on Etsy, and a handmade crystal soap from Love Your Suds (her soaps are actually amazing!! And also, she's one of my best friends in real life!) 

Check out the photos below of each of their gift boxes!

Picture
Picture
Picture
Picture
0 Comments
<<Previous

    Archives

    May 2022
    July 2021
    March 2021
    May 2020
    April 2020
    March 2020
    February 2020
    December 2019
    November 2019

    Categories

    All

    RSS Feed

© 2023 Lucie Radcliffe Design 
  • Home
  • Shop
    • Digital Art Gallery
    • Cookie Cutters >
      • View All Cutters
      • Birthday & Celebration Collection
      • Baby Shower Collection
      • Bridal & Wedding Collection
      • Cars & Trucks
      • Champagne Bottles & Beverages
      • Fashion & Accessories
      • Florals
      • Summer & Tropical
      • Autumn & Halloween
      • Hanukkah
      • Tiles, Plaques, & Shapes
      • Christmas Season
      • Hearts, Love & Valentines
      • Spring, Easter, & St. Paddy's
      • Animals & Insects
      • SUGAR BOX Exclusives
      • STL Cutters
    • Embossed Parchment Paper
    • Decorating Supplies
    • Workbooks & Graphics
    • MiniCake Stands >
      • MiniCake Stands
      • Prototypes & Discounts
      • STL Cake Stand Files
    • STL LIBRARY >
      • STL Cutters
      • STL Cake Stands
      • STL Cookie Display Stands
      • STL Files for Molds & Boo-Boo Sticks
    • My Recipes
    • Amazon Recommendations
    • Other Amazing Online Shops!
  • Cookie Classes
    • Workbooks & Graphics
    • Free Tutorials
    • Easter & Springtime Classes & Guides
    • Summertime Classes & Guides
    • Autumn & Halloween Classes & Guides
    • Winter & Christmas Classes & Guides
    • Champagne & Liquor
    • Fashion Classes & Guides
    • Portrait Classes & Guides
    • 3D Printing & Cookie Preservation
  • Custom Cookies
    • Content Creation
  • Blog